Our ultimate guide onhow to calculate dough hydrationexplains the baker’s percentage formula, its impact on texture (crusty vs. soft), and how to adjust it for perfect sourdough, pizza, and more.
Table of Contents
Introduction: Unlocking the Language of Bread
Hey there, fellow baker. Let me ask you a question. Have you ever meticulously followed a bread recipe, weighed every gram, and still ended up with a loaf that was more doorstop than delight? Or maybe you’ve been in a bakery forum and seen folks throw around terms like “78% hydration” or “high-hydration dough” and felt like you were missing out on some secret club.
I’ve been there. Early in my baking journey, I thought those bakers were just showing off. But then I learned the secret, and it transformed my bread from inconsistent to incredible. That secret isn’t a magical flour or a rare yeast strain—it’sunderstanding dough hydration.
Calculating dough hydrationis the single most important skill you can learn to move from following recipes to truly understanding them. It’s the key tobaker’s percentages, the universal language of professional bakers. It’s what determines whether your crumb is tight and soft or open and airy, and whether your crust is crackly-thin or thick and chewy.
This guide is your one-stop shop to mastering this concept. We’ll ditch the confusion and break downexactly how to calculate dough hydration, how it changes your bread, and how you can use it to bake with confidence. Ready to become the master of your dough? Let’s dive in.
What is Dough Hydration? It’s More Than Just Water
Let’s start with the basics. In the simplest terms,dough hydrationis the ratio of water to flour in your bread recipe, expressed as a percentage.
But if you think of it as just a math problem, you’re missing the beauty of it.Dough hydrationis the soul of your bread. It’s the primary variable that controls:
- Texture & Crumb:This is the big one. Higher hydration is the secret to those gorgeous, open, hole-filled crumbs you see in artisan loaves. Lower hydration gives you a tighter, more uniform crumb, perfect for sandwich bread.
- Dough Handling:Ever struggled with a sticky, slack dough that’s impossible to shape? Or a stiff, tough one that tears? You’re feeling the direct effect of hydration levels.
- Crust Characteristics:Want a thin, shatteringly crisp crust? Higher hydration is your friend. Prefer a thicker, softer crust? You’ll want a lower hydration level.
- Fermentation Speed:Water activates the yeast. A wetter dough often ferments a bit faster than a drier one.
Understandinghow to calculate hydration in bakingallows you to diagnose problems before the dough even hits the oven. It turns baking from a mystery into a predictable science.
The Baker’s Percentage: Your New Best Friend
To truly gethow to calculate dough hydration, you need to understand its home: the baker’s percentage system. This is the professional baker’s scaling tool, and it’s brilliantly simple.
Here’s the rule:The total weight of the flour is always 100%.Every other ingredient is then expressed as a percentage of that flour weight.
So, if a recipe has 1000g of flour and 700g of water, the water is 70% of the flour weight. It’s a 70% hydration dough. It also means that 20g of salt would be 2%, and 10g of yeast would be 1%.
Why is this so powerful? Because it makes recipes scalable. Whether you’re making one loaf with 500g of flour or ten loaves with 5kg, the percentages stay the same. You just do the math. This system is the foundation ofprecise dough hydration calculation.
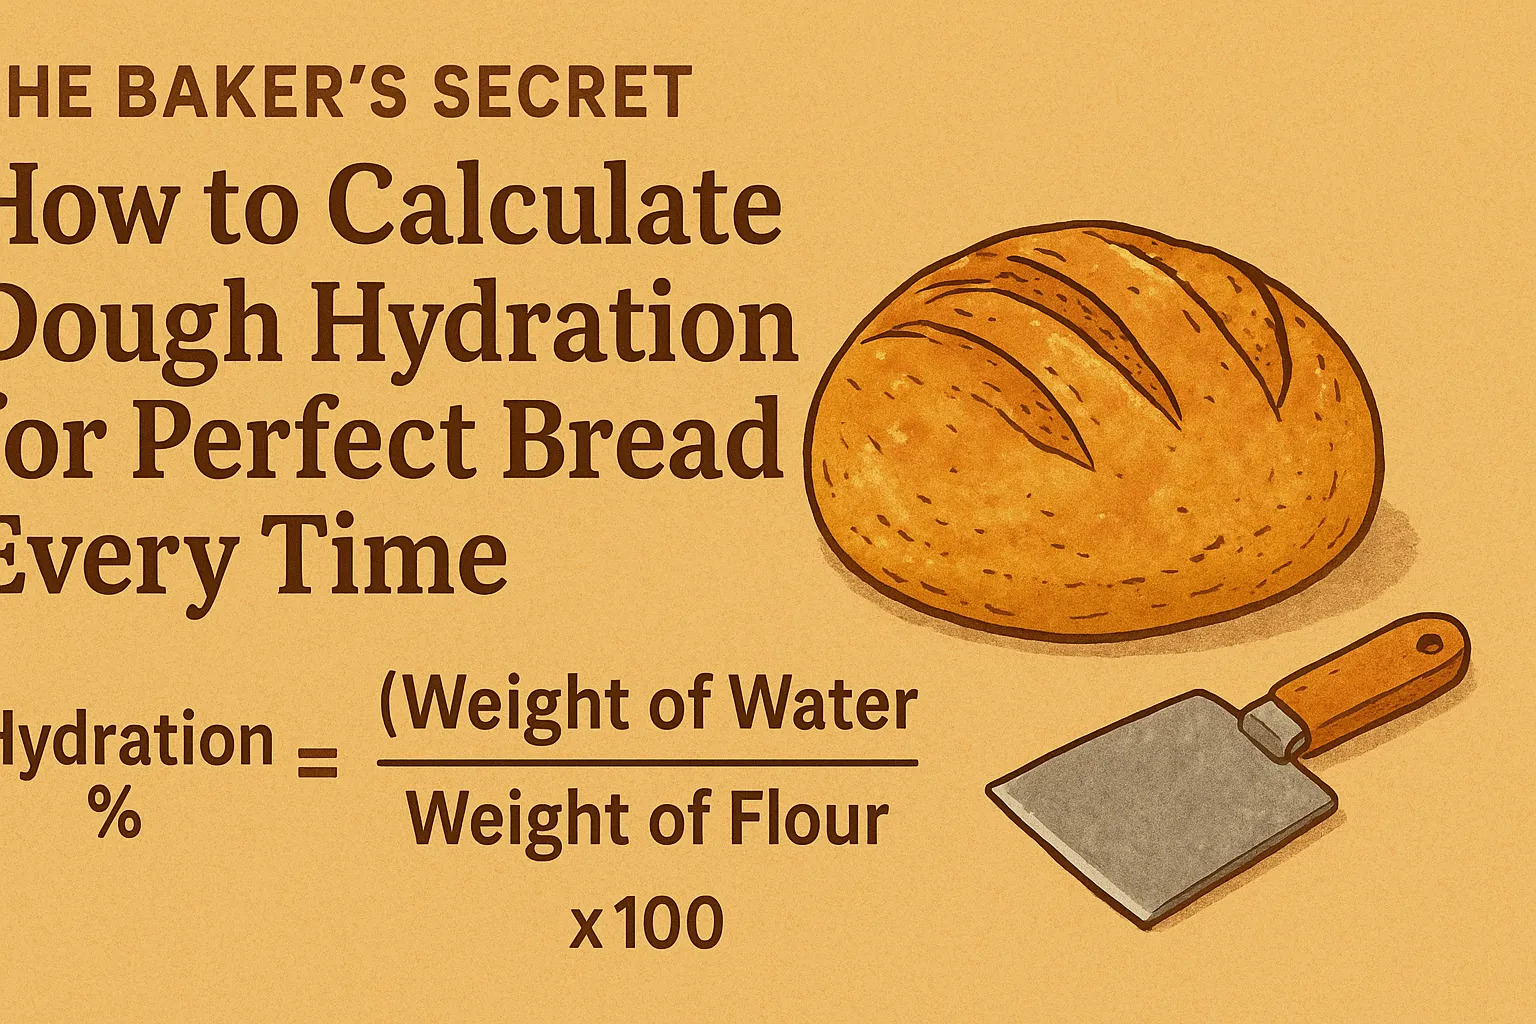
How to Calculate Dough Hydration? The Simple Formula
Alright, here’s the moment you’ve been waiting for. The formula forcalculating bread hydrationis incredibly straightforward:
Hydration % = (Weight of Water / Weight of Flour) x 100
Let’s make this practical with an example.
Example 1: A Simple White Loaf
Say you have a classic recipe:
- 500g Bread Flour
- 350g Water
- 10g Salt
- 7g Instant Yeast
Here’s your hydration calculation:
- Water weight:350g
- Flour weight:500g
- Math: (350 / 500) = 0.7
- Percent: 0.7 x 100 =70%
This is a 70% hydration dough. It’s a fantastic, all-purpose hydration that’s easy to handle and produces a lovely, versatile loaf.
But wait—it gets more interesting.What about recipes with milk, eggs, or butter?
The Real-World Twist: Accounting for All Liquids
This is where many home bakers get tripped up. For an accuratetotal dough hydrationcalculation, you need to account for ALL liquids, not just water.
Why? Because milk, eggs, and even butter contain water that contributes to the final hydration level of your dough.
Example 2: Let’s Calculate Brioche Hydration
Brioche is rich, buttery, and decadent. Let’s see what’s really going on.
- 500g Bread Flour
- 150g Water
- 250g Eggs (about 5 large eggs)
- 250g Butter
- 50g Sugar
- 10g Salt
- 10g Yeast
Step 1: Find the water hidden in other ingredients.
This is the key toaccurate hydration calculation.
- Eggs:Eggs are roughly 75% water. So, 250g eggs × 0.75 =187.5g water
- Butter:Butter is about 15% water. 250g butter × 0.15 =37.5g water
- The recipe also has150gof plain water.
Total Water Weight = 150g + 187.5g + 37.5g = 375g
Step 2: Plug it into the formula.
(375g Total Water / 500g Flour) × 100 =75%
Mind-blown, right? Even though the dough feels rich and fatty, itseffective hydrationis a high 75%! This is why brioche has such an incredibly tender, soft crumb. If you only counted the plain water, you’d get a very misleading 30%. This is the most important step in learninghow to calculate hydration for bread recipesaccurately.
Hydration in Action: From Sourdough to Pizza Dough
Now for the fun part. Let’s talk about what these numbersfeelandtastelike. Here’s a practical guide tounderstanding hydration levelsin the wild.
Low Hydration (50% – 60%)
- Dough Feel:Stiff, firm, and very easy to handle. Not sticky at all.
- The Bread:Dense, tight crumb. Think bagels, pretzels, or some crispbreads. The crust is typically thicker.
- Perfect for:Bagels (50-55%), German pretzels.
Medium Hydration (60% – 70%)
- Dough Feel:Smooth, pliable, and cooperative. The “sweet spot” for beginners.
- The Bread:A balanced, versatile crumb. Perfect for sandwich bread, classic country loaves, and focaccia.
- Perfect for:Sandwich bread (65%), New York-style pizza dough (60-65%).
High Hydration (75% – 85%+)
- Dough Feel:Sticky, slack, and a real challenge to shape. It requires strong gluten development through folds. Don’t be tempted to add more flour!
- The Bread:The holy grail of artisan baking: an open, airy crumb with large, irregular holes and a crisp, blistered crust.
- Perfect for:Ciabatta (80-90%), rustic sourdough (75-82%), Neapolitan pizza (65-70% feels higher due to the flour).
A Special Note on Sourdough Hydration Calculation
Sourdough adds a fun variable: the starter itself has flour and water! To find yourtrue sourdough hydration, youmustinclude the flour and water from your starter in the totals.
Example: Sourdough Hydration
- 400g Bread Flour
- 300g Water
- 100g Mature Starter (assuming a 100% hydration starter, meaning it’s fed with equal weights flour and water)
- 10g Salt
Step 1: Break down the starter.
100g of 100% hydration starter =50g Flour+50g Water
Step 2: Find the TOTAL amounts.
- Total Flour =400g + 50g =450g
- Total Water =300g + 50g =350g
Step 3: Calculate the final hydration.
(350g / 450g) × 100 =77.7%
Voilà! This is a high-hydration sourdough. If this is your first time, you might want to lower it to around 72% to make the dough more manageable.Adjusting dough hydrationis how you learn and improve.
Beyond the Math: The Other Players on the Field
While hydration is the star, it’s not a solo act. A few other factors dramatically change how hydration behaves.
1. Flour is Everything
Different flours absorb watercompletelydifferently. This is the number one thing to remember.
- Bread Flour:High protein (12-14%) loves water and can handle high hydrations.
- All-Purpose Flour:Lower protein (10-12%) can’t absorb as much. A recipe written for bread flour might be a soupy mess with AP flour.
- Whole Wheat Flour:The bran is thirsty! It soaks up water like a sponge. A 75% hydration whole wheat dough will feel much stiffer than a white flour dough at the same hydration. You often need toincrease hydrationfor whole grains.
- Rye Flour:Has very little gluten and behaves very differently. It can feel gluey at hydrations where wheat flour would still be firm.
2. The Feel of the Dough is King
The number from yourdough hydration formulagets you to the right neighborhood, but your hands will get you to the right house. As you mix, pay attention. Does the dough seem too dry? Add a tablespoon of water. Too wet and soupy? A sprinkle of flour can help. Your goal is a smooth, cohesive dough that’s slightly tacky but doesn’t stick to your hands. This tactile feedback is everything.
3. Gluten Development is the Partner
Water allows gluten to form. But a high-hydration dough only becomes light and airy if you develop that gluten properly. Techniques likestretch and foldsorcoil foldsduring bulk fermentation are essential for building strength in a wet dough. Without it, you’ll have a puddle, not a loaf.
Your Action Plan: How to Use This Knowledge?
You’re now armed with the theory. Here’s how to put it into practice tomorrow.
- Audit a Recipe:Before you bake, calculate the hydration of your go-to recipe. Just knowing that number will change how you view it.
- Tweak and Learn:Next time you bake, nudge the hydration up or down by 2-3%. Take notes! How did the dough feel? How did the crumb change? This is the fastest way to learn.
- Hold Back Water:A pro trick is to hold back about 5% of the water in a recipe. Mix everything, then slowly add the reserved water until the doughfeelsright. This accounts for your specific flour and kitchen environment.
- Keep a Baking Journal:This is non-negotiable. Write down your recipe, the calculated hydration, the flour brand, how the dough felt, and the result (with a crumb photo!). Over time, this journal will be your most valuable baking resource.
Conclusion: Your Journey to Bread Mastery Starts Here
Learninghow to calculate dough hydrationis like getting the answer key to the universe of baking. It demystifies the process and gives you immense control. You’re no longer just a passenger following a map; you’re the driver, able to adjust the route to get whereyouwant to go.
So, grab your kitchen scale, pick a simple recipe, and run the numbers. Feel the difference between 65% and 75%. Embrace the sticky mess of a high-hydration dough and see the incredible results it can yield.
Remember, every loaf is a lesson. Happy baking
Leave a Reply